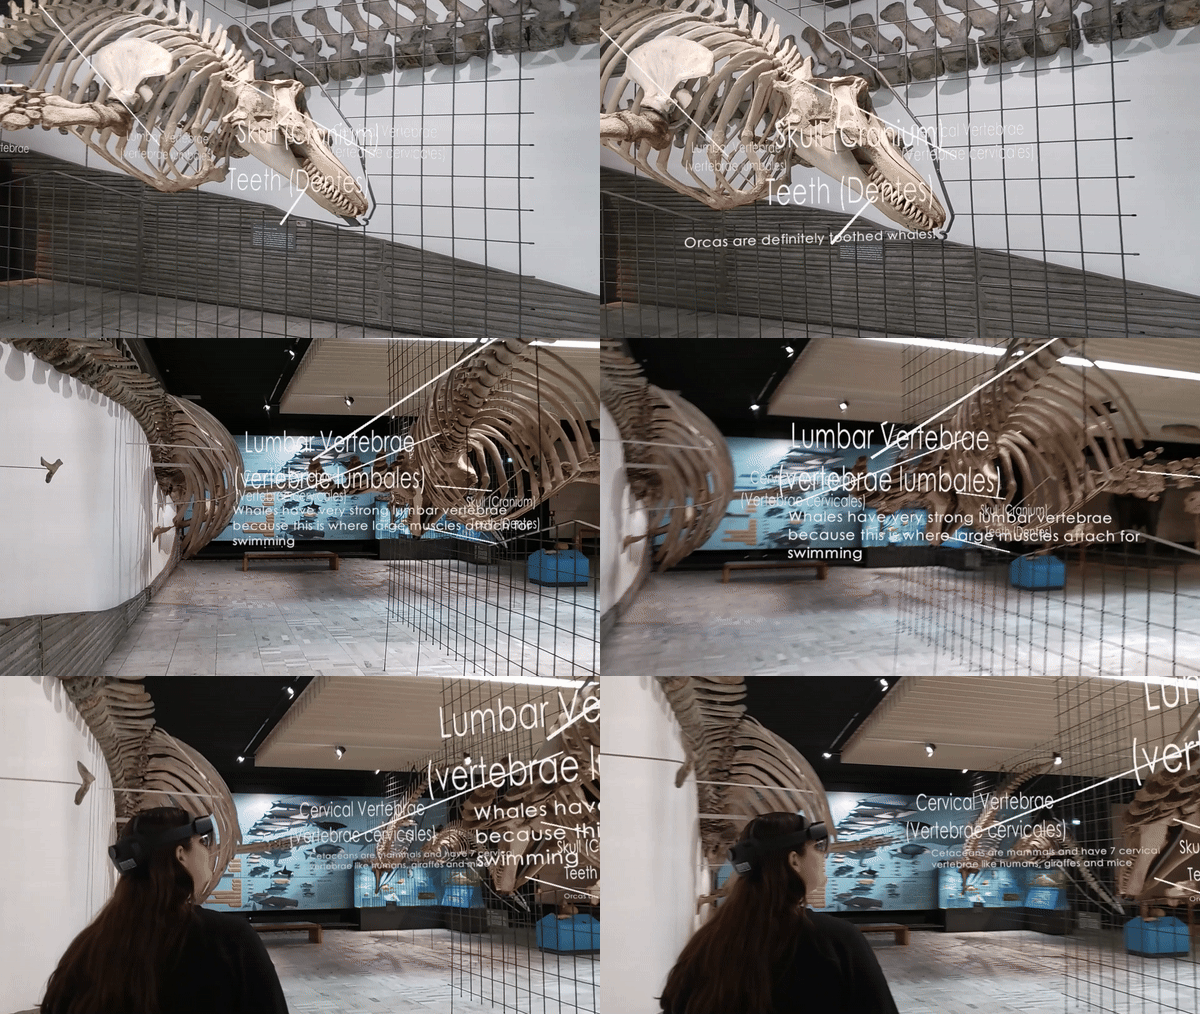
AR Labelling
A spatial labelling system that identifies exhibit parts and reveals component-level explanations on demand.
Name
AR Labelling
Level and Category
Application-level pattern under the category-level class Experience Presenter.
Intent
Help visitors identify, distinguish, and learn about individual parts or components of a physical exhibit by linking spatially anchored AR labels to exhibit elements and revealing additional explanations only when visitors approach or select the relevant label.
Rationale
Many museum exhibits contain multiple meaningful parts, but physical exhibition spaces often cannot provide detailed labels for every component without creating visual clutter or disrupting the exhibit layout. HMD-based AR can provide situated labels that are visually connected to the relevant exhibit parts while keeping detailed explanations hidden until they are needed.
AR Labelling therefore supports component-level understanding in a space-efficient way. Lightweight labels and pointing lines maintain orientation, while conditional reveal mechanisms prevent all information from being shown at once.
Problem
Visitors may be unable to access detailed knowledge about specific exhibit parts because physical labels, panels, or printed explanations are limited by space, visibility, language, or curatorial constraints. When an exhibit contains several components, visitors may not know which part is being discussed, where to look, or how the component contributes to the whole object.
In HMD-based AR, simply overlaying all information at once can overload the field of view and obscure the exhibit. If labels are poorly aligned, too dense, or too persistent, they may create confusion rather than clarity.
Context
This pattern applies to HMD-AR museum experiences in which a physical exhibit has identifiable parts, regions, mechanisms, features, or components that should be explained in relation to their spatial location. It is especially relevant for anatomical exhibits, technical artifacts, fossils, historical objects, reconstructed objects, ecological displays, or large exhibits where visitors need component-level orientation.
The pattern assumes that labels, pointing lines, highlights, or explanation panels can be anchored with sufficient spatial stability in relation to the physical exhibit.
Use When
Use this pattern when:
- visitors need to understand the structure, function, or meaning of multiple parts of an exhibit;
- physical labels are insufficient because of space, readability, language, or curatorial constraints;
- detailed explanation should appear only on demand;
- visitors benefit from seeing a direct spatial connection between a label and the corresponding exhibit part;
- the exhibit is large, visually complex, or difficult to interpret without spatial annotations.
Avoid using this pattern as the primary presentation approach when the exhibit has only one simple point of interest, when the number of labels would become excessive, or when spatial registration is too unstable to maintain reliable label-to-part alignment. It may also be unsuitable when labels would cover important visual details or interfere with a more immersive, narrative, or playful interaction.
Forces
- Clarity vs. clutter: Labels must be visible and informative, but too many labels or lines can overwhelm the scene.
- Precision vs. robustness: Pointing lines and label anchors should align accurately with exhibit parts, but the system must tolerate small spatial-registration errors.
- Information access vs. visual preservation: Visitors should be able to access detailed explanations without permanently covering the physical exhibit.
- Engagement vs. distraction: Labels can invite exploration, but overly animated or dense labels may distract from direct observation.
- Proximity sensitivity vs. panel stability: Distance-based reveal should respond quickly to visitor interest, but not flicker when the visitor moves slightly.
- Spatial anchoring vs. visitor movement: Labels should remain connected to the exhibit while remaining readable from typical viewing positions.
- Uniformity vs. component specificity: Labels should follow a consistent style, while still adapting to different component sizes, positions, and interpretive importance.
Solution
Place spatially anchored labels near relevant exhibit components and connect each label to its target component through a thin pointing line, highlight, or anchor marker. Each label should contain a concise title or keyword that identifies the component. Detailed explanation should remain hidden by default and appear only when the visitor approaches, gazes at, selects, or otherwise indicates interest in the label.
A typical implementation contains four elements. First, a pointing line or spatial connector links the exhibit component to the virtual label. Second, a short title label is placed near the endpoint of the line, using legible typography and sufficient contrast. Third, a proximity trigger, gaze trigger, or selection trigger detects visitor interest in the label. Fourth, a detailed explanation panel fades in when triggered and fades out when the visitor moves away or deselects the label. The explanation panel may include text, images, short audio, a 3D highlight, or a small animation, but should remain focused on the selected component.
The pattern should not display all detailed explanations simultaneously. The default state should remain lightweight, with only titles, lines, and possibly subtle highlights visible. When one label is active, other labels may remain visible in reduced form or be temporarily shown less prominently. This helps visitors focus on the selected component while preserving an overview of the exhibit structure.
Design Parameters and Recommended Settings
- Number of labels: Use only the labels needed to explain meaningful components. As a practical guideline, keep simultaneously visible labels limited and group secondary labels if the exhibit contains many parts.
- Line thickness: Use thin but visible pointing lines, approximately 1–2 cm in perceived width, adjusted according to viewing distance, lighting, and exhibit scale.
- Title distance: Place the title label approximately 0.2–0.8 metres from the target component in 3D space, depending on component size, occlusion risk, and viewing angle.
- Trigger radius: Use a proximity trigger radius of approximately 1.2–3 metres around the label anchor or interaction zone. Reduce the radius in dense label arrangements and increase it for large exhibits.
- Activation method: Use proximity, gaze dwell, hand selection, or voice command depending on the required level of visitor control. Proximity is easy to use, while hand or gaze selection provides clearer visitor control.
- Fade duration: Use a fade duration of approximately 0.5 seconds for explanation panels so that information appears responsively without feeling abrupt.
- Panel placement: Place detailed panels near the selected label but outside the main visual area of the exhibit component. Avoid placing panels directly over the physical feature being explained.
- Typography: Use concise titles, high contrast, and readable font size. Detailed text should be short and broken into compact units.
- Highlight style: Optionally highlight the selected exhibit part through outline, glow, colour tint, or subtle animation. Use this carefully to avoid covering material details.
- Inactive label state: Keep inactive labels visible but visually secondary, or hide them progressively when the active panel is open.
- Flicker prevention: Add small buffer or a small delay when entering and exiting trigger zones so that panels do not repeatedly appear and disappear due to minor visitor movement.
- Fallback behaviour: If spatial alignment becomes unreliable, reduce labels to a more general overview mode, increase trigger tolerance, or provide a manual list of labels as backup.
Consequences
When applied successfully, AR Labelling helps visitors connect information directly to the relevant physical exhibit parts. It supports component-level inspection without requiring dense physical labels or persistent panels around the exhibit. Because labels can be revealed on approach or selection, visitors can explore component-level information according to their own interest.
However, the pattern also introduces risks. Too many labels can clutter the visual scene and compete with the exhibit itself. Misaligned lines or unstable anchors can create confusion about which part is being described. Overly sensitive triggers may cause panels to flicker or appear unintentionally, while overly restrictive thresholds may hide information that visitors expect to see. The pattern therefore requires careful tuning of label density, line placement, trigger radius, fade timing, and fallback behaviour.
Related Patterns
- Preceding activation patterns
- Step-In Trigger can precede AR Labelling by activating the exhibit-related labelling mode at a defined viewing position.
- Exhibit Knowledge Trigger can precede AR Labelling when a short concept-specific interaction unlocks component-level explanations.
- Preceding guidance patterns
- Avatar Guide can precede AR Labelling by guiding visitors to the labelled exhibit before activation and presentation.
- Forward Cue-Routing can precede AR Labelling by guiding visitors through lightweight route cues before activation and presentation.
- Complementary presentation patterns
- Sequential Explanation can be combined with AR Labelling when each explanation step should activate a corresponding spatial label or component highlight.
- AR Exhibit Feature Drawing can build on AR Labelling when visitors are asked to mark or draw features after first identifying labelled parts.
- AR Exhibit Reassembler can build on AR Labelling when visitors should understand labelled part-whole relations before reconstruction.
- AR Object Catching can build on AR Labelling when labelled features or regions prepare visitors for an embodied object-based task.
Composition Notes
AR Labelling is usually used after visitors have reached and activated a point of interest. A typical composition is:
PoI Guide → Experience Indicator → AR Labelling
For example:
Avatar Guide → Step-In Trigger → Sequential Explanation → AR Labelling
AR Labelling can also operate as a spatial layer within Sequential Explanation. In this composition, each explanation step activates only the labels relevant to that step. This avoids showing all annotations at once and helps visitors connect the current narrative or interpretive point to specific physical components.
If labels are used before a playful interaction, they should prepare visitors by identifying the relevant exhibit features without overexplaining the later task.
Implementation Alignment
The pattern can be implemented as a reusable labelling module or Unity prefab that combines:
- anchor points;
- pointing lines;
- title labels;
- proximity or selection triggers;
- explanation panels;
- fade animations;
- optional highlights;
- event-based handoff to other modules.
Relevant exposed parameters include label title, label anchor, target component anchor, line thickness, line length, label offset, trigger radius, activation method, dwell time, panel content, panel position, fade duration, highlight style, inactive-label transparency, and fallback mode.
Implementation-level events may include:
- label shown;
- label approached;
- label selected;
- panel opened;
- panel closed;
- component highlighted;
- label deselected;
- trigger exited;
- alignment warning;
- labelling mode ended.
These events can support debugging, system logs, observation sheets, and later evaluation of label discoverability, component attention, panel dwell time, repeated label access, missed labels, flicker events, and transition success.
Example Use
In a natural-history museum, an HMD-AR experience overlays labels onto a whale skeleton. Thin pointing lines connect title labels to the skull, flipper, rib cage, spine, and tail region. By default, visitors see only the component names and lines. When a visitor approaches or selects the label for the skull, a short explanation panel fades in and describes feeding adaptation, skull structure, and related anatomical features. The skull is subtly highlighted while the panel is open. When the visitor moves away, the panel fades out and the overview labels remain visible.
In a sequential composition, each explanation step activates only the labels relevant to the current topic.
