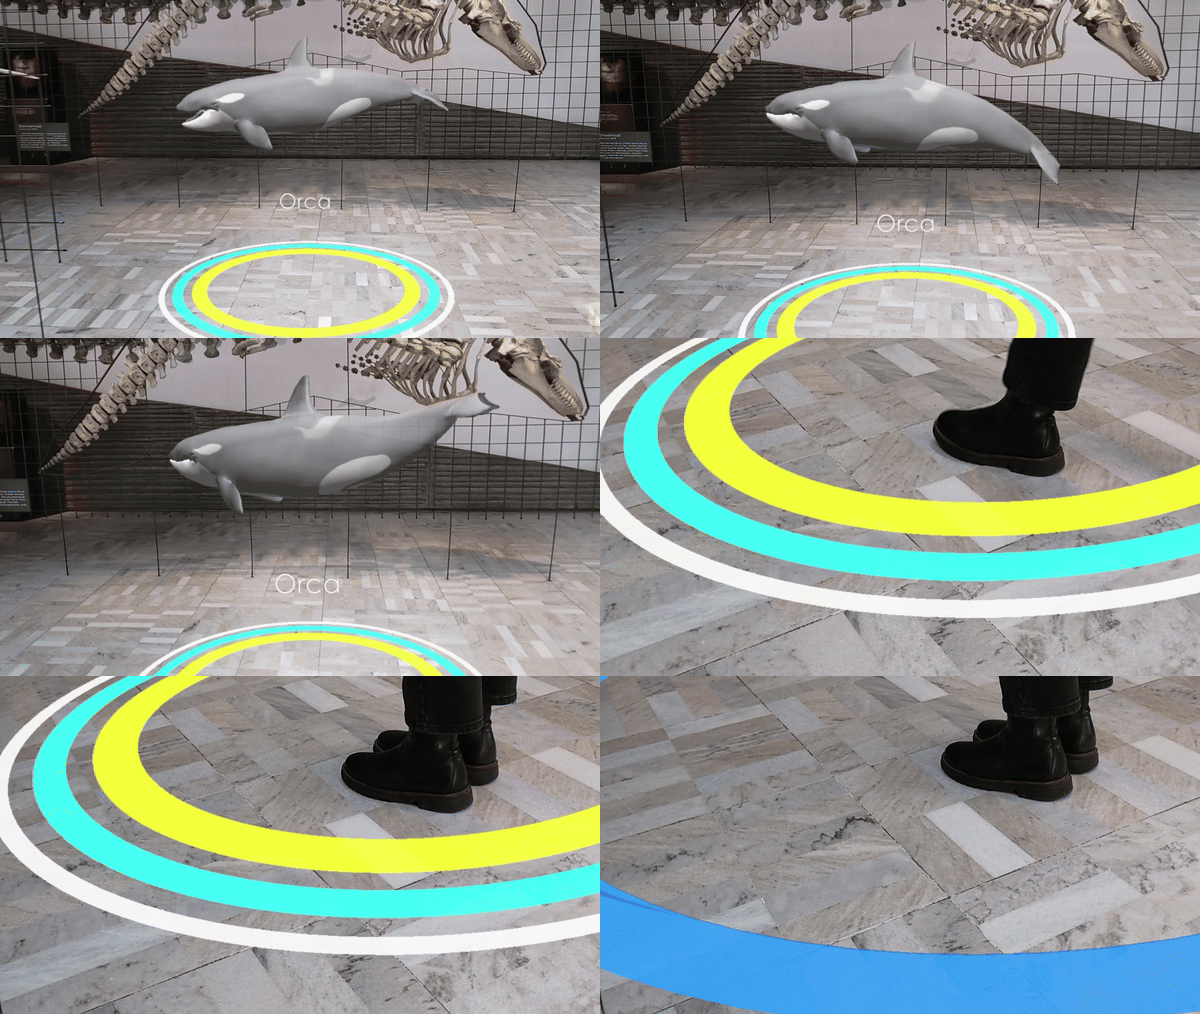
Step-In Trigger
A floor-based entry zone that indicates and activates AR exhibit experiences through embodied movement.
Name
Step-In Trigger
Level and Category
Application-level pattern under the category-level class Experience Indicator.
Intent
Provide a floor-based spatial entry zone that indicates where an HMD-AR exhibit experience can be activated and allows visitors to start the experience through natural embodied movement rather than through complex gestures, handheld controls, or menu-based interaction.
Rationale
In HMD-based AR museum visits, visitors do not automatically know which exhibits contain AR content or how an AR experience should be started. A visible entry zone on the floor provides a simple spatial convention: visitors can understand that stepping into the zone means entering or launching the AR experience.
The pattern uses proximity and short dwell-based activation to reduce the need for explicit menu interaction. It supports low-effort activation for first-time users and creates a clear transition from noticing an AR opportunity to starting the exhibit-related experience.
Problem
Visitors may overlook AR-enabled exhibits, hesitate after arriving at a point of interest, or fail to understand how to activate the corresponding AR content. This problem is especially likely when only selected exhibits are augmented and when the digital content remains invisible until activation.
Gesture-based or menu-based activation can increase the learning burden for first-time HMD users. A more direct and embodied activation strategy is needed when visitors should be able to start the AR experience by moving naturally into a clearly marked spatial zone.
Context
This pattern applies to HMD-based AR museum experiences in which visitors arrive near a point of interest and need to recognize that an AR experience is available. It is especially relevant when:
- only selected exhibits provide AR content;
- visitors freely explore the exhibition without a fixed interaction sequence;
- the activation opportunity needs to be visible from a short distance;
- the museum wants to avoid handheld controls or complex gesture input;
- the AR experience should begin at a safe and meaningful viewing position.
The pattern assumes that the system can detect the visitor’s position reliably enough to determine whether they have entered and remained inside the trigger zone.
Use When
Use this pattern when:
- visitors need a clear and easy-to-use way to activate an AR exhibit experience;
- the intended action can be communicated through a spatial entry zone;
- stepping into a floor-based circle or marker fits the exhibition layout;
- the activation should feel embodied and hands-free;
- the experience should transition smoothly from arrival to presentation.
Avoid using this pattern when the floor is visually cluttered, crowded, unsafe, or unsuitable for spatial markers. It may also be less appropriate when activation should require a meaningful exhibit-related action rather than simple spatial entry; in that case, Exhibit Knowledge Trigger may be more suitable.
Forces
- Discoverability vs. visual subtlety: The trigger zone must be noticeable enough to invite action, but not so bright or large that it clutters the floor or distracts from the exhibit.
- Activation reliability vs. visitor freedom: The system must detect entry reliably, while avoiding accidental activation when visitors only pass nearby.
- Easy-to-use interaction vs. meaningful engagement: A simple step-in action is easy to understand, but may provide less interpretive meaning than a concept-linked activation task.
- Feedback clarity vs. interruption: Activation feedback should clearly confirm that the experience has started, but should not interrupt the museum flow with excessive effects.
- Spatial placement vs. safety: The trigger zone should be close enough to the exhibit to feel meaningful, but far enough to preserve safe viewing distance and visitor circulation.
- Automation vs. visitor control: Automatic activation can feel seamless, but visitors should still understand what has happened and how to exit or continue.
Solution
Place a visible virtual circle or entry marker on the floor in front of the AR-enabled exhibit. The marker should indicate that the visitor can start the AR experience by stepping into the zone.
The trigger zone should be positioned at a safe and meaningful viewing distance from the exhibit. A label, icon, preview model, or short prompt may be placed near the marker to communicate what experience is available. The visual design should be noticeable but not visually dominant.
When the visitor enters the zone, the system begins a short dwell check to avoid false activation. If the visitor remains inside the zone for the required dwell duration, the activation is confirmed. The system then provides multimodal feedback, such as a pulse animation, short spatial audio cue, label change, or fade-out of the trigger marker.
After activation, the trigger elements should fade, transform, or become secondary so that visitors understand that the main AR experience has begun. The pattern should then hand over to a presentation pattern such as Sequential Explanation, AR Labelling, or another exhibit-related interaction pattern.
Design Parameters and Recommended Settings
- Circle radius: Use a radius of approximately 0.6–1.2 metres, with 0.9 metres as a practical default.
- Dwell time: Use a short stable dwell threshold of approximately 0.40 seconds after the visitor enters the zone.
- Placement from exhibit: Place the circle centre approximately 0.8–1.2 metres from the exhibit’s front edge, adjusted according to exhibit size, safe viewing distance, and visitor flow.
- Detection threshold: Define the entry condition based on visitor position, feet or head projection, or another stable body-position reference.
- Label height: Place title labels or short prompts at approximately 0.5 metres above the floor or in another peripheral but readable position.
- Preview element: Optionally include a small 3D model, icon, or animation that previews the available AR content.
- Visual style: Use a clear but low-clutter visual form, such as a glowing ring, pulsing outline, soft disc, or thematic floor marker.
- Pulse speed: Keep pulsing slow and subtle enough to attract attention without creating visual fatigue.
- Audio cue: Use a short spatial audio cue, such as a chime, splash, or thematic sound, to confirm activation.
- Fade duration: Use an optional fade-out of approximately 0.5 seconds for the circle, label, and preview element after activation.
- Activation state: Distinguish between at least available, entered, dwell started, activated, and completed states.
- Fallback behaviour: If tracking becomes unstable or the visitor exits the zone before dwell completion, cancel activation without disrupting the experience and keep the marker available.
Consequences
When applied successfully, the Step-In Trigger makes AR-enabled exhibits easier to discover and start. It reduces reliance on gesture menus or handheld controls and supports a natural embodied action that first-time HMD users can understand quickly. The pattern also creates a clear transition from arrival at the exhibit to activation of the AR experience.
However, the pattern can also create problems if the trigger zone is too large, too bright, too dense, or too close to visitor pathways. Visitors may accidentally activate content when passing by, or may miss the marker if it is too subtle. If spatial tracking is unstable, the circle may appear misaligned or activation may fail. The pattern therefore requires careful tuning of radius, placement, dwell time, feedback, and fallback behaviour.
Related Patterns
- Alternative activation pattern
- Exhibit Knowledge Trigger is an alternative Experience Indicator pattern. It is more suitable when activation should involve a short exhibit-related action or concept-linked micro-task rather than simple spatial entry.
- Preceding guidance patterns
- Avatar Guide can precede Step-In Trigger by guiding visitors to the point of interest where the trigger zone becomes active.
- Forward Cue-Routing can precede Step-In Trigger by guiding visitors through lightweight route cues and handing over to the trigger zone at the destination.
- Follow-up presentation patterns
- Sequential Explanation can follow Step-In Trigger when the activated experience should present structured content step by step.
- AR Labelling can follow Step-In Trigger when visitors need spatially placed labels or annotations connected to parts of the physical exhibit.
- AR Exhibit Reassembler can follow Step-In Trigger when the activated experience involves reconstructing or assembling exhibit-related elements.
- AR Exhibit Feature Drawing can follow Step-In Trigger when the activated experience involves drawing, highlighting, or sketching exhibit features in AR.
- AR Object Catching can follow Step-In Trigger when the activated experience involves catching, removing, or responding to virtual objects around the exhibit.
Composition Notes
Step-In Trigger normally occupies the transition between arrival and exhibit-related AR presentation. A typical composition is:
PoI Guide → Step-In Trigger → Experience Presenter
For example:
Avatar Guide → Step-In Trigger → Sequential Explanation → AR Labelling
The handoff from guidance should be explicit. When visitors arrive at the point of interest, guidance cues should reduce intensity or end, and the Step-In Trigger should become visually primary.
The handoff to presentation should also be clear. Once activation succeeds, the circle, label, and preview elements should fade out or become secondary so that visitors understand that the main AR experience has begun.
If several AR-enabled exhibits are nearby, only the relevant or nearest Step-In Trigger should be active, while other trigger zones remain hidden or made less visible.
Implementation Alignment
The pattern can be implemented as a reusable spatial-trigger module or Unity prefab that combines:
- a floor circle object;
- position detection;
- dwell-time logic;
- feedback animation;
- optional spatial audio;
- preview content;
- activation-state control;
- event-based handoff to subsequent modules.
Relevant exposed parameters include circle radius, circle position, placement offset from the exhibit, dwell time, detection threshold, visual style, transparency, pulse speed, label text, label height, preview element, audio cue, fade duration, activation state, and fallback behaviour.
Implementation-level events may include:
- circle shown;
- visitor entered circle;
- visitor exited circle;
- dwell started;
- dwell cancelled;
- activation confirmed;
- feedback played;
- circle faded;
- tracking unstable;
- experience launched.
These events can support debugging, system logs, observation sheets, and later evaluation of discoverability, missed activation, false activation, dwell time, hesitation, and transition success.
Example Use
In a natural-history museum, a glowing circular marker appears on the floor in front of a whale or orca exhibit. A small label and a subtle preview model indicate that an AR experience is available. When the visitor steps into the circle and remains there briefly, the circle pulses, a short spatial audio cue confirms activation, and the indicator elements fade out.
The system then launches the exhibit-related AR experience, for example a Sequential Explanation that presents interpretive content or an AR Labelling sequence that highlights different anatomical features of the exhibit.
