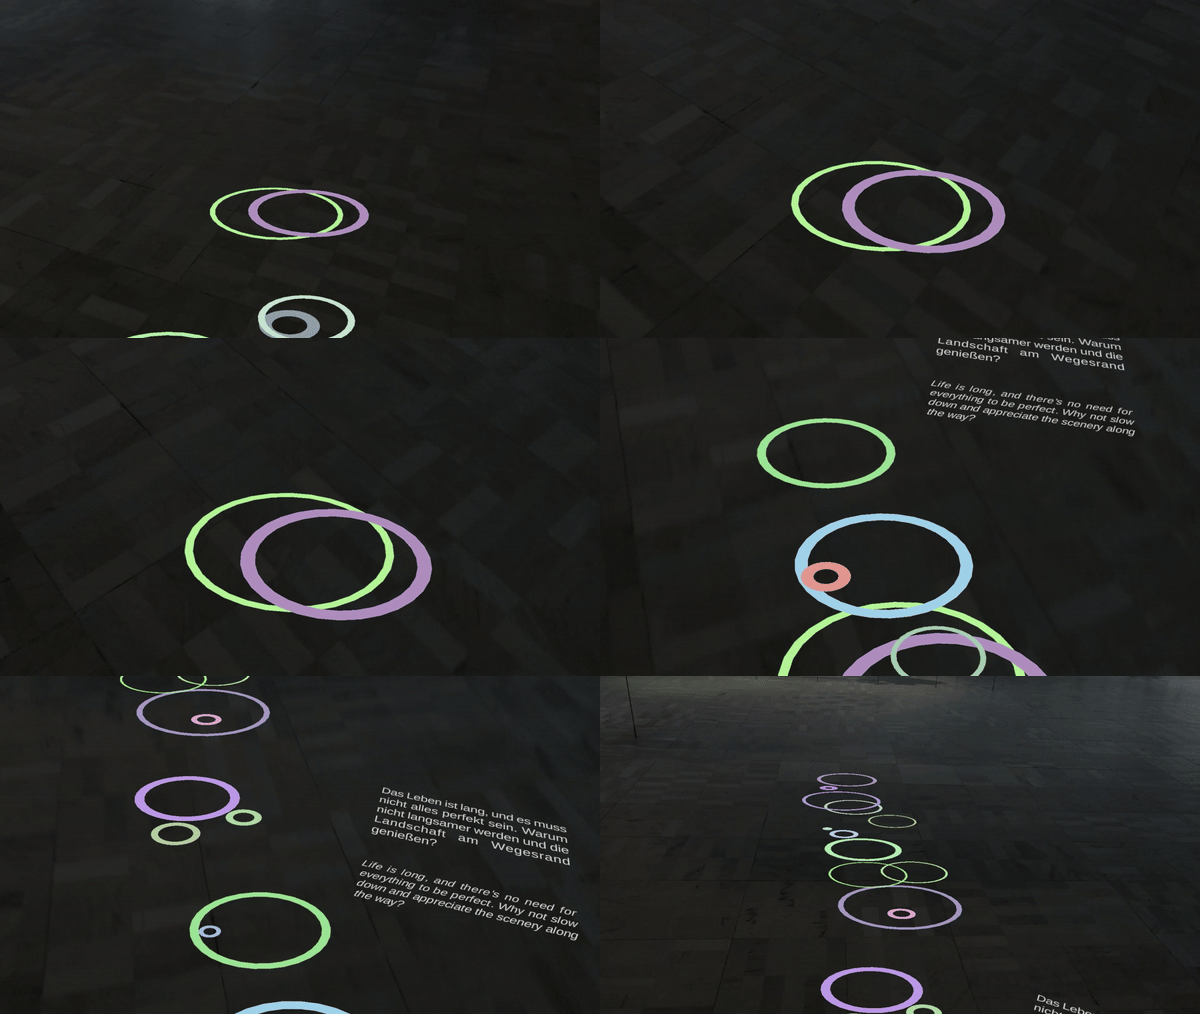
Forward Cue-Routing
Ground-based visual cues that anticipate turns and guide visitors along a route toward one or more points of interest.
Name
Forward Cue-Routing
Level and Category
Application-level pattern under the category-level class PoI Guide.
Intent
Provide lightweight, ground-anchored AR cues that indicate the forward direction, anticipate upcoming turns, and help visitors follow a route toward one or more points of interest without relying on a character-based guide or visually dominant floating interface elements.
Rationale
In HMD-based AR museum experiences, visitors need route guidance that remains visible and understandable while leaving their forward view available for exhibits, other visitors, and the physical environment. Continuous lines, floating arrows, or large visual markers can become visually intrusive, especially in dense exhibition spaces.
Forward Cue-Routing addresses this problem by placing directional cues on or near the floor plane, where they can support peripheral awareness and route anticipation without occupying the central exhibit-viewing area. The pattern is especially useful when the guiding experience should feel subtle, environmental, or thematic rather than social or character-driven.
Problem
Visitors may lose orientation at decision points such as corners, crossings, transitions between rooms, or visually dense gallery areas. If navigation cues appear too late, visitors may already have passed the intended turning point. If cues are too prominent, they may distract from the exhibits and reduce the sense of situated museum exploration.
In HMD-based AR, this problem is intensified by limited field of view, divided attention, and the need to preserve awareness of the physical environment during movement.
Context
This pattern applies to standing and walking HMD-AR museum experiences in which visitors follow an authored route through corridors, open galleries, or multi-point exhibition layouts. It is especially relevant when the route contains turns, junctions, or intermediate waypoints, and when the experience requires a subtle guidance layer that does not occlude exhibits.
The pattern assumes that route segments and waypoints can be authored in advance and that the system can place cues with sufficient spatial stability in relation to the floor plane, visitor position, and points of interest.
Use When
Use this pattern when:
- visitors need directional support, but a moving avatar or large above-ground interface would be too visually dominant;
- the route should be indicated through subtle spatial cues, such as ripples, footprints, glowing arrows, lines, particles, or other thematic floor-based visual elements;
- visitors should receive anticipatory guidance before turns, junctions, or transitions between rooms;
- the museum wants to preserve attention on physical exhibits while still making the route easy to follow;
- the experience requires a lightweight guidance layer rather than a social, narrative, or character-based guide.
Avoid using this pattern as the only guidance mechanism when the floor is visually cluttered, highly reflective, crowded, or difficult to augment reliably. It may also be insufficient when visitors need social, narrative, or spoken guidance, or when the route requires complex decision-making that cannot be communicated through simple forward cues alone.
Forces
- Visibility vs. low interruption: The cues must be noticeable enough to guide the visitor, but subtle enough to avoid dominating the exhibition environment.
- Anticipation vs. overload: Cues should appear early enough before turns or decision points, but not so early or frequently that they become confusing or visually noisy.
- Route clarity vs. exhibit attention: The route should remain understandable while allowing visitors to keep their attention on the surrounding exhibits.
- Pacing vs. autonomy: Cue movement and rhythm can encourage walking pace, but should not pressure visitors to move faster than they wish.
- Spatial stability vs. environmental variability: Floor-anchored cues depend on reliable spatial mapping and can become confusing if they jitter, drift, or appear misaligned.
- Lightweight guidance vs. narrative support: The pattern can guide unobtrusively, but provides less social or narrative support than a character-based guide.
Solution
Implement route guidance through a sequence of lightweight AR cues placed on or near the floor plane. The cues should appear along an authored route and provide anticipatory direction before turns, junctions, or intermediate waypoints.
The route can be authored as a waypoint sequence, multi-segment path, floor-based cue chain, or hybrid representation. At each relevant waypoint or decision point, the system spawns a short cue pattern, such as ripples, footprints, glowing arrows, particles, lines, or other thematic floor-based visual elements. These cues should progress or orient toward the next waypoint so that visitors can infer the direction of travel before they reach the turn.
Optional spatial audio can be used to support the visual cue, especially at turns or visually complex decision points. Audio should remain short and directional rather than becoming constant narration.
At the destination, the final cue should converge into a stable arrival marker, such as a glowing marker, converging ripple, or short pulse. This marker confirms that the visitor has reached the point of interest and prepares the transition to the next interaction pattern.
Design Parameters and Recommended Settings
- Cue type: Use visual forms such as ripples, footprints, glowing arrows, particles, lines, or other thematic ground-based visual elements.
- Cue placement: Place cues on or near the floor plane and align them with the authored route, visitor movement direction, and safe walking path.
- Cue scale and spacing: Keep cues large enough to be visible in the HMD field of view, but avoid covering too much of the floor or competing with physical exhibits.
- Cue movement speed: Calibrate cue movement so that it supports normal walking speed. As a practical reference, the cue may reach the midpoint between waypoints within approximately 2–3 seconds at average walking speed.
- Trigger radius: Use a trigger radius of approximately 1–2 metres before each waypoint or turn so that visitors receive the cue before reaching the decision point.
- Turn anticipation distance: Increase the lead distance before sharp turns, corners, or visually complex junctions; reduce it in short or narrow passages where early cues may overlap.
- Cue display duration: Keep cues temporary and allow them to fade after use. A short fade-out of approximately 1–2 seconds can reduce visual clutter while preserving route legibility.
- Transparency and brightness: Use enough contrast for the cue to be visible under exhibition lighting, but avoid excessive brightness that distracts from physical exhibits or creates visual fatigue.
- Audio lead time: When audio is used, trigger it approximately 0.5–1 second before or together with the visual cue to pre-alert the visitor without creating constant narration.
- Route progress: Optionally show the path already passed through lower-intensity cues or fading traces, but avoid leaving persistent visual trails that clutter the floor.
- Arrival indication: Use a stable final marker, such as a glowing disc, converging ripple, or short pulse, to indicate that the destination point of interest has been reached.
- Fallback behaviour: If spatial tracking becomes unstable, reduce cue complexity, pause the route display, or provide a simple recovery indication rather than continuing to show misaligned cues.
Consequences
When applied successfully, Forward Cue-Routing can support smooth and predictable navigation while keeping the visitor’s forward view relatively clear. It reduces reliance on maps or floating interface elements and can make movement through the museum feel more integrated with the physical environment. Because the cues are ground-anchored and lightweight, the pattern can preserve attention on exhibits and support an unobtrusive sense of flow.
However, the pattern also introduces risks. If the cues are too subtle, visitors may miss them; if they are too bright, frequent, or persistent, they may create visual clutter. Misaligned or jittering floor cues can break presence and reduce trust in the system. The pattern also provides less narrative and social support than Avatar Guide, and therefore may be less suitable when the experience depends on a guide character, interpretive narration, or strong dramaturgical framing.
Related Patterns
- Alternative guidance pattern
- Avatar Guide is an alternative guidance pattern under the same PoI Guide category. It is more socially and narratively expressive, but also more visually prominent.
- Follow-up activation patterns
- Step-In Trigger can follow Forward Cue-Routing when the visitor reaches the point of interest and should activate the next experience through a spatial entry zone.
- Exhibit Knowledge Trigger can follow Forward Cue-Routing when the transition into the AR experience should be connected to a meaningful exhibit-related marker.
- Follow-up presentation patterns
- Sequential Explanation can follow the route guidance phase after arrival at the target exhibit.
- AR Labelling can follow the route guidance phase when visitors need spatially placed labels or annotations connected to parts of the physical exhibit.
Composition Notes
Forward Cue-Routing is usually used during the movement phase of an HMD-AR museum experience. A typical composition is:
Forward Cue-Routing → Experience Indicator → Experience Presenter
For example:
Forward Cue-Routing → Step-In Trigger → Sequential Explanation → AR Labelling
The handoff at the destination should be clearly marked. For example, the final floor cue may converge into a stable arrival marker, after which a Step-In Trigger or Exhibit Knowledge Trigger becomes active.
If the route includes multiple points of interest, the pattern can be repeated between exhibits, but each route segment should have a clear start cue, decision-point cue, arrival cue, and recovery behaviour.
Implementation Alignment
The pattern can be implemented as a reusable route-guidance module or Unity prefab that combines:
- a waypoint list;
- floor-plane placement;
- cue spawning;
- trigger-zone detection;
- animation control;
- optional spatial audio;
- arrival detection;
- event-based handoff to subsequent modules.
Relevant exposed parameters include cue type, cue scale, cue spacing, propagation speed, trigger radius, anticipation distance, opacity, fade duration, audio use, audio lead time, waypoint list, arrival radius, and fallback thresholds.
Implementation-level events may include:
- route started;
- cue spawned;
- turn cue triggered;
- waypoint reached;
- visitor left path;
- route resumed;
- arrival cue triggered;
- tracking unstable;
- route ended.
These events can support debugging, system logs, observation sheets, and later evaluation of route completion, hesitation at turns, missed cues, deviation frequency, and transition success.
Example Use
In a natural-history museum, visitors are guided from the entrance area toward a target exhibit through a sequence of subtle glowing ripples on the floor. As visitors approach a corridor junction, the ripples begin to propagate toward the correct turn, supported by a short spatialized sound cue from the turning direction. The cue pattern remains low enough to avoid covering the visitor’s view of surrounding exhibits.
When the visitor reaches the destination, the final ripples converge into a glowing disc near the point of interest. This arrival cue then hands over to a Step-In Trigger, which activates the next exhibit-related AR experience.
